Hey there! I'm Kyle, and today we will be taking a brief look at the process for how I made this animation of Ostrich Knight.
This won't cover the nuances of movement in animation, but rather the process of animating itself. What do I do? How do I start? Let's talk about that.
Step 1: Character Design
To get the most common question out of the way, I do all of my pixel art and animation in Aseprite.
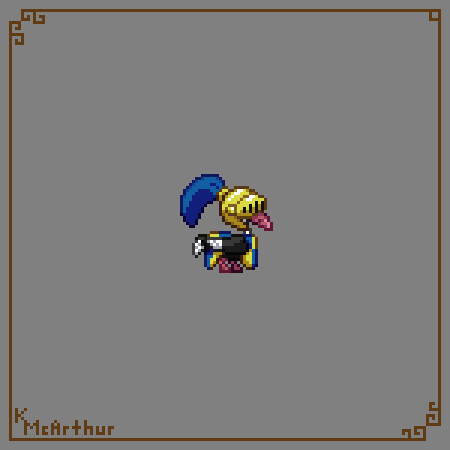
Now then, first things first, you need a character design. Here's the re-design I did of Ostrich Knight. What a heroic-looking lad. In this stage, I aim for a fully realized, detailed character sprite. (How to go about actually doing that may be the topic of a future talk.) Everything that you want in the final product should be present here from the big design choices down to the nuances of the lighting. This is the baseline that you will use for, well, everything else, so pull out all the stops. However, do keep in mind that during animation, you may find parts of this original design just don't work for any number of reasons, so it's okay to come back and make changes. This is normal, don't stress it. Once you're happy with your character sprite and don't currently anticipate any changes, you're ready to begin the animation process.
Step 2: Setup
So you're ready to animate, but unsure how to begin. Here's how I do the initial setup of my workspace, which trust me, it will help a lot in your endeavors to be properly prepared, so don't skip this step. However, please feel free to alter the setup to whatever best fits your preferences - comfort is key. I recommend you set up each individual element on its own layer. It'll just make your life way easier. Label. Everything.
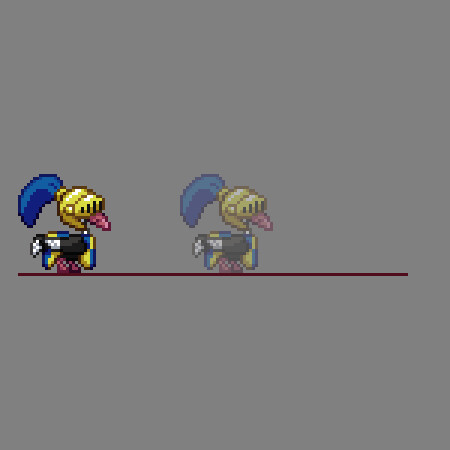
On the left I have the original character design, and I set his layer and the rest of these setup layers to be constant for every frame (any changes I make on one frame will apply to all frames.) This will be my guiding light that I refer to as I draw each frame. It's important to always keep in mind what your character looks like so they don't morph proportions and details throughout an animation. This can and will happen without proper guides, and you don't want to waste tons of time constantly referring to your original frame for no reason.
After that, I setup a straight ground guide line at his feet. Keeping track of the ground should be obviously useful, but it's especially so for any animations that involve various elements leaving and returning to the ground, such as feet. You can setup other guidelines as needed too. You may have one for the top of the character, or tracking their waist line, or some other important element. This will change from animation to animation.
Finally, I take the character design and set up a copy of it in the center of my canvas. This is where I'm going to be actually animating. This will prove useful in a number of ways, but the main one is again, just another reference to help you keep track of the actual shape and size of your character. No amorphous blobs (yet)! Set this center guide's opacity to something low, such as 50% or lower, so that you're able to easily see the difference between it and what you are drawing. With those pieces setup, you're ready to move on to the actual animating stage.
Step 3: Blobs
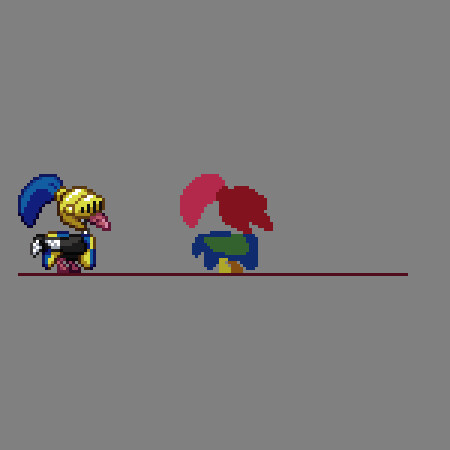
The very first stage of actually animating our beautiful bird is also the easiest: blobbing. This stage involves separating the various parts of the character into visually distinct, but simple shapes. Generally speaking, everything that will have its own separate movement will get its own color, and each of those will get their own layer. An exception to this in this example is the plume and head, which I left on the same layer because it was easier to move them together, and neither's animation would affect the other, but the distinct colors still helped me with visualization. In this example, I have separate layers for Head, Wing, Front Leg, Body, and Back Leg. All of those layers are also put into a group together to keep things organized from my references. Label. Everything.
To make the blobs, it's really your choice how you go about it. For this initial image, I like to just trace the ghosted reference image because it helps me build a proper sense for the forms I'm going to be working with. Starting off accurate is better than starting off inaccurate. However, this is not crucial, and you could rough it if you prefer. We're going to be a lot more freeform in the next stage.
Step 4: Mock-up
This next stage is probably the biggest, but also the most fun. This is where all the magic happens. Here, we are designing what the actual animation looks like, and we'll do so by continuing to use our blob technique. You'll notice I added a few more colors to the head to aid in visualizing the movement; this is completely at your discretion, so just do whatever you need to help you see what you're working on.
The beauty of working with blobs is they should be incredibly fast to draw, move, and change. We don't care about the details at this stage. For each frame, I start over and draw the shapes again very roughly as I work, focusing primarily on the movement. Drawing the shapes new each time, rather than copying, pasting, and moving them, tends to lead to much more organic and dynamic animations in my experience. I only copy and paste when the shape will be going through very little or no change. Make frequent use of the ghosted reference image to make sure things don't get too out of control with your forms. It's important that the volumes never change (unless doing so on purpose)! I also recommend using onion skinning features (which let you see the previous and next frames) while you work to help make the movement smooth.
Don't be afraid to make big and rapid changes, as that's the entire point of working with blobs. As the movement starts to become more solidified, we'll gradually chisel away at the blobs until they are more and more defined, eventually leading us to the shapes we'll be using in the end result animation. During the process, however, only bother to make them as defined as you need to to get the movement feeling accurate. Frequently check the animation playback as you work (or just have it constantly running) so you can see the effects your changes are having, and please, do yourself a big favor, and make sure you're actually checking the animation at the size you intend for it to be viewed at. If viewed at a different size, the changes you're making may not translate like you think they will.
Once you have the movement worked out and the blobs chiseled away, you're ready for the next and final step.
Step 5: Detailing

There's not a whole lot to say about this stage. It's a time-intensive grind, but it's the stage that will make your animation finally pretty. I start by doing flood fills directly on the chiseled blobs, mapping out the general colors being used, then go through each individual piece and color it frame by frame. Here's where you'll do a lot of your inner animation, stuff that doesn't get covered by single color blobs. An example of that is the rotation of the tabard on Ostrich Knight.
Refer to your reference image often to make sure your colors and lighting are always consistent. This part of the process is mostly just making that original sprite again, however many times, because most of the motion should be done at this point, and you're just coloring. It's important that you save this step for last because if you are detailing while also sorting out the movement, you stand to waste a ton of time when you need to make changes and re-do all of your detailing over and over. It's much more efficient to work things out in these stages. And when you're efficient, you'll have more time and energy to make cool touches that bring your animation to life, rather than just wanting to get it done.
I'll end on a fun note, by showing you the original run animation for Ostrich Knight from a game jam from something like 10 years ago. It was one of my first animations. He and I have come a long way since then, and through lots of practice, you too, will go far, kid.
That's all for today. Until next time!
-Kyle
This blog post was originally published on my Patreon in 2020.